
Imagine creating your own automated magic for your next video project. Think custom videos for emails that feel one-on-one, videos that pop up on social media without you lifting a finger, and even personalized 'thank you' videos that land right in your audience's hearts - all done automatically!
No more stressing about making each video from scratch. Wideo’s integration with Zapier got your back, making your video dreams come true with zero manual hassle.
How does Wideo’s integration with Zapier work? - Step by step
If you're new to Zapier and looking to create personalized videos through Wideo's automation technology, this comprehensive guide will walk you through the process step by step. Don't worry if you're unfamiliar with Zapier – we've got you covered with clear instructions to help you seamlessly integrate and automate your video creation.
Before you begin, read our article on important considerations when crafting videos for automation.
Step 1: Creating the Base Video
To initiate the process, start by accessing Wideo and crafting the video that will serve as the foundation for your subsequent variations. If time or expertise is a concern, remember that Wideo offers production services for your convenience.
Step 2: Defining Variable Content
Once your base video design is complete, it's time to specify the elements that will vary across your videos. Variable content can encompass texts, images, videos, and colors.
- Texts: When designating variable text, assign a name to each variable within the automation section of the editor. If a specific variable appears multiple times in the video (such as a person's name), ensure consistency by using the same variable name for each occurrence.
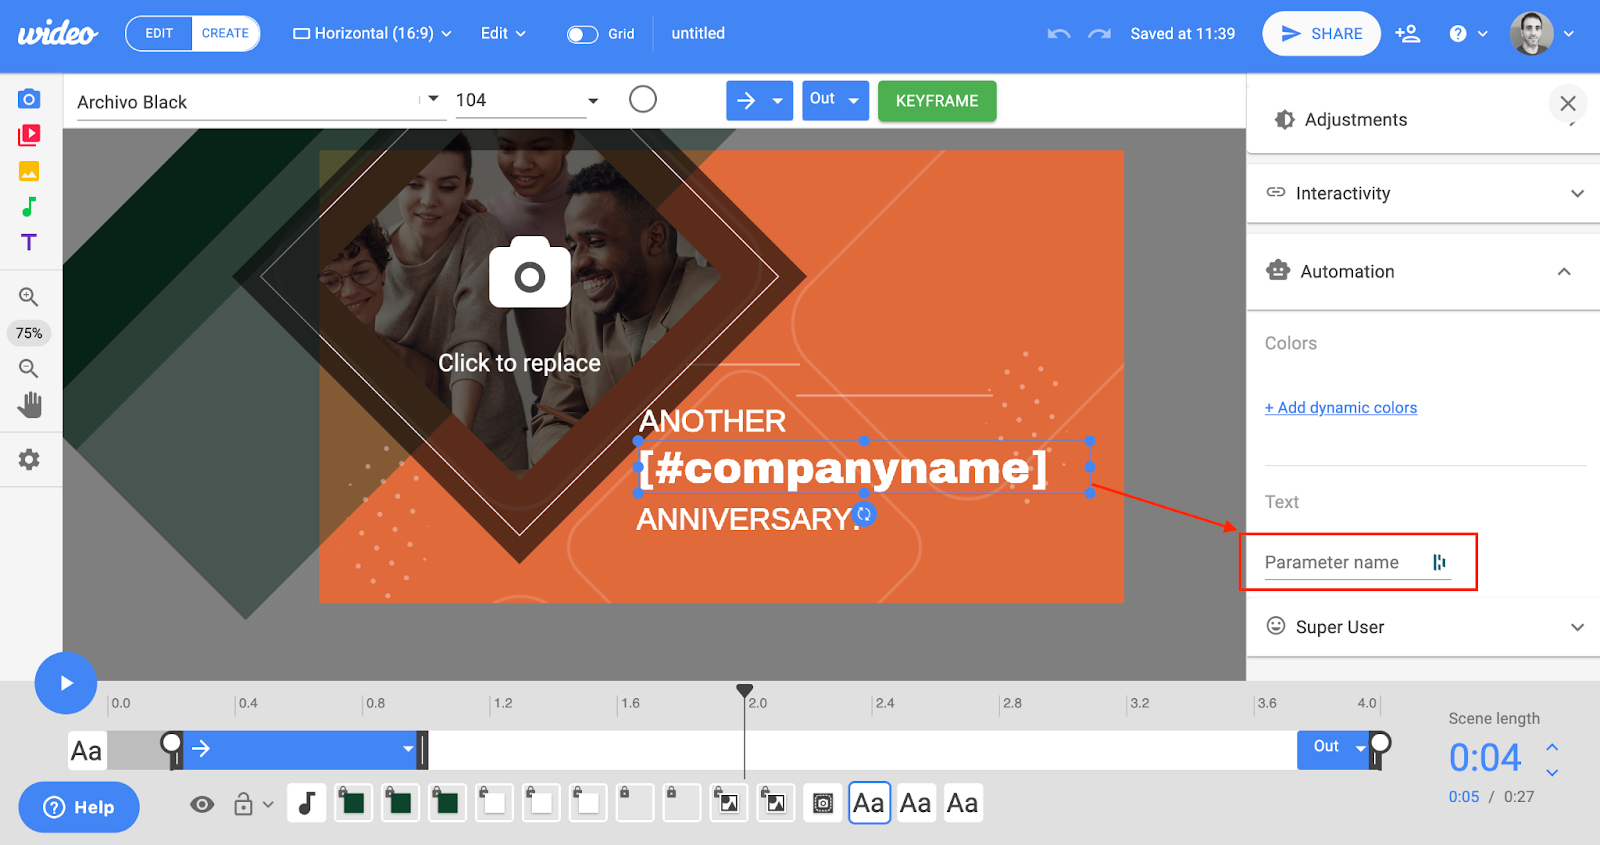
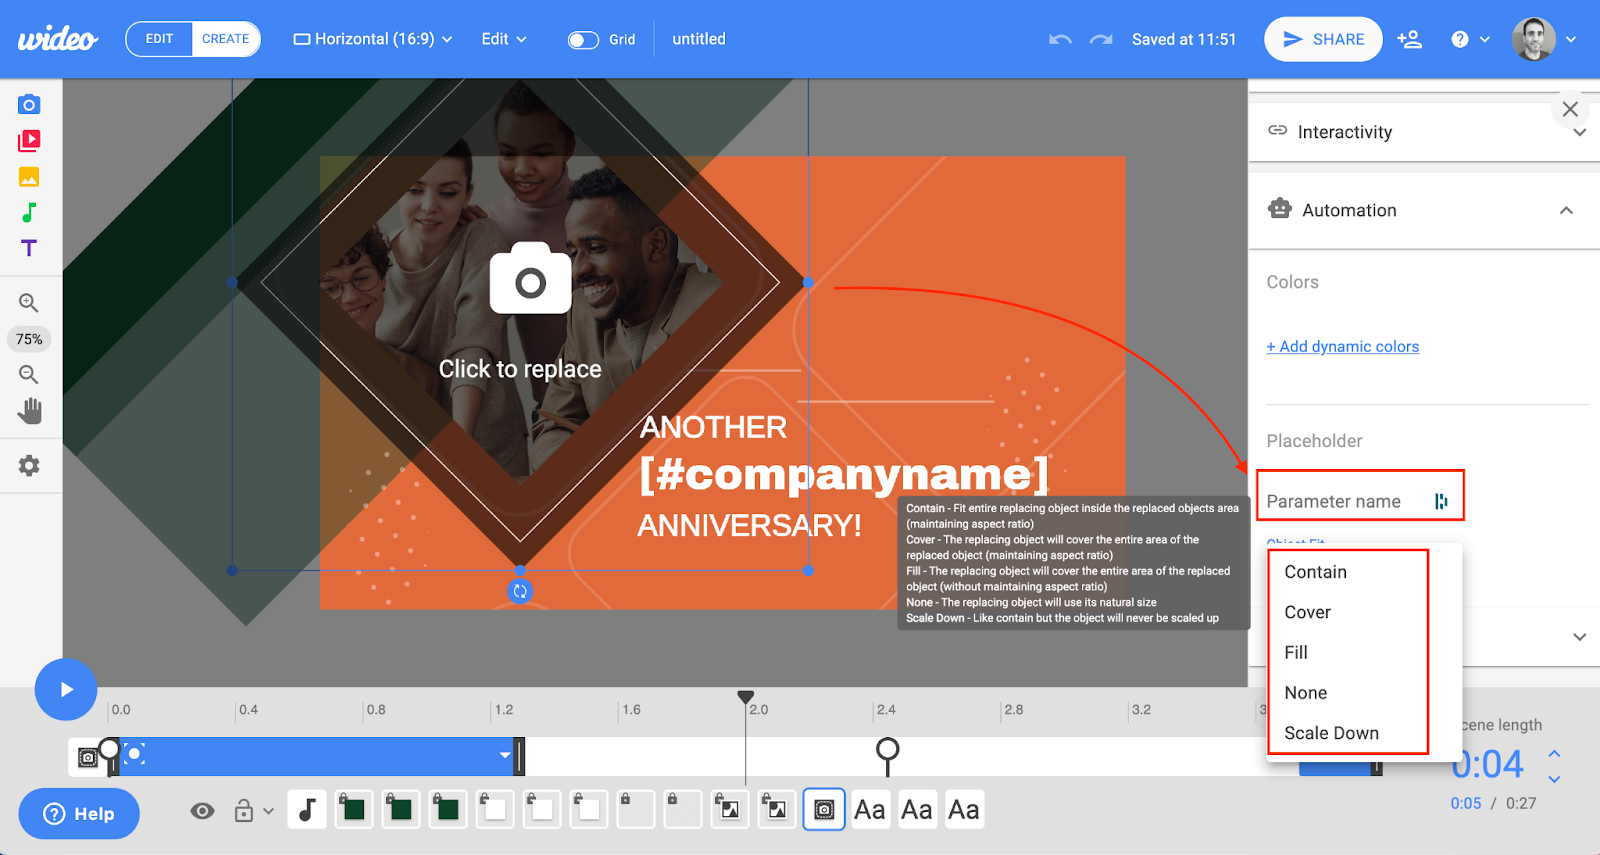
- Images or Videos: Click on the image or video you want to be replaced automatically, navigate to the automation section, and assign a unique name to the variable. Specify how the image or video should fit within the designated space.
- Colors: Variable colors can be defined within the automation section. However, limiting variable colors to a maximum of two is advisable.

Step 3: Constructing the Automation Zap
With your base video ready and variable elements assigned, it's time to create an automation Zap in Zapier. This process involves defining a trigger and implementing the automation. Here's how:
- Trigger: Begin by selecting a trigger for your Zap. Examples include a completed form submission, a new row added to a Google Sheet, or a tagged user in a database. This trigger will provide the necessary values to replace variables in the video.
- Video Creation: Utilize Wideo's integration with Zapier to generate videos automatically. This entails replacing the variable content in the base video with values extracted from the trigger:
- Choose the Wideo option within Zapier.
- Select "Create Video" as the event.
- Link your Wideo account to Zapier using your API key in your Wideo account's Profile Settings. You can find more details about your API KEY here.
- Choose the appropriate base video or video template, which must include variable content.
- Assign trigger values to each variable in the base video to generate a personalized video.
- Choose the Wideo option within Zapier.


Step 4: Distributing Your Created Video
Just so you know – the final step depends on how you intend to use the video generated in the previous step. The automated video creation process will yield an mp4 video URL as output. You can employ this URL to:
- Send the video via email.
- Share the video on social media platforms.
- Upload the video to a database (CSV, Google Sheet, etc.).
By following these step-by-step instructions, you can seamlessly integrate Wideo's automation technology with Zapier to create personalized videos efficiently and effortlessly.
Note: When conducting a test in Zapier, the resulting video will not match the one you initially selected or contain the added variables. Instead, a generic video is generated to allow you to proceed with the zap. This generic video lets you test subsequent steps that rely on video data. The actual video is not employed in testing due to the time required for video creation. You must publish the Zap to evaluate it with the authentic video, followed by a test using a simulated trigger within a production environment.
Inspirational Use Cases
Automatically Post Videos to Your Facebook Account
This versatile integration is adaptable for multiple scenarios, such as sharing product videos, customer reviews, or even personalized greetings. In this case, we'll demonstrate the automatic posting of video reviews.
The example assumes you're collecting customer reviews through a Typeform.
Zap Construction:
- Trigger the Zap when a customer completes a review form, capturing their name, position, and review text.
- Generate the video using the client's form input.
- Seamlessly post the video review to your Facebook page through the integrated capabilities of Zapier and Facebook.
Here's a ready-made Zap template for your convenience.
Automatically create promo videos for new products in WooCommerce.
Making a video for every new WooCommerce product can take time and effort. With this Zap in place, though, when you list a new product on WooCommerce, Wideo automatically generates a dedicated product video. Streamline your e-commerce operations and elevate your product presentation effortlessly.
Zap Construction:
- Set the trigger as a new product is added to your WooCommerce.
The trigger activates whenever a new product is added. - Utilize Wideo within Zapier to design the video. Connect your Wideo account, select the base video you've previously created, and assign values from the trigger database to the appropriate variables.
- Consider adding a final step: generate a new Google Sheet containing product details and links to the corresponding product videos.
Here's a ready-to-use Zap template to get you started.
Send Personalized Videos to Customers via Email
Engage your customers deeper by delivering personalized videos tailored to their preferences. This example assumes you're utilizing MailChimp as your email marketing tool that integrates seamlessly with Zapier.
Zap Construction:
- Trigger the Zap when a user within your MailChimp database is tagged with a specific label or tag.
- Use Wideo to create the personalized video. Consider the customer information that's accessible from your email marketing integration. If more information is needed, add a step that retrieves comprehensive customer data from your database.
Once the video is designed, assign the relevant variable values. - As the final step, dispatch the personalized video via email to the tagged customers. This can be achieved either through Zapier's email functionality or your email marketing platform's Zapier integration.
Feel free to use this ready-made Zap template to streamline the process.